Docker打包SpringCloud应用镜像
Docker与SpringCloud微服务打包,并使用阿里云私服进行镜像托管
前言
之前就像把自己的毕业设计放到服务器上跑了,但是受限于多个微服务,服务器性能不够的因素,还是一直没有实现.
看到了关于SpringNative的介绍公众号,这玩意确实牛逼,但是使用的限制比较大,以后有时间的话可能会弄一下.
在网络上想要把Spring服务打到Docker镜像里搜到的教程都是Boot的,但是仔细一想,Cloud也只是基于Boot的,不过相互可以进行通信
准备工作
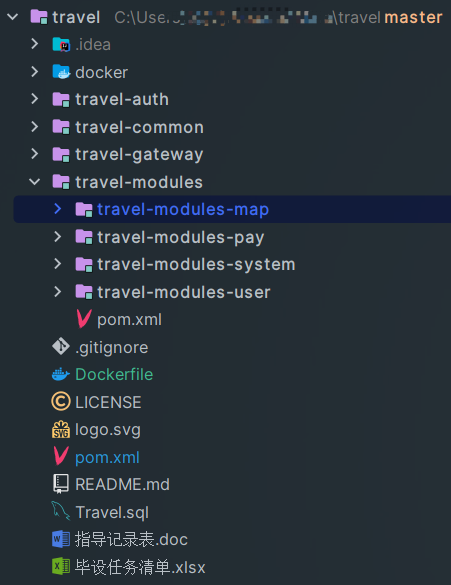
要部署的项目
首先准备的就是一个想要部署的多个微服务,因为之前开发的毕设都在一起,就直接拿这个当作例子了
Docker
之后是Docker的安装,因为在win上,直接安装了Docker Desktop
安装完成之后配置阿里云的镜像加速源
"registry-mirrors": [ |
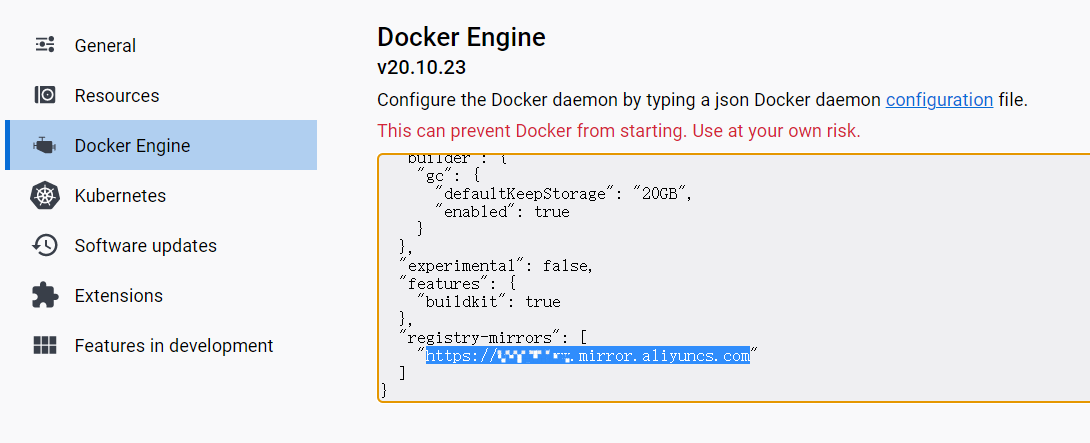
个人的加速源可以在这里查看
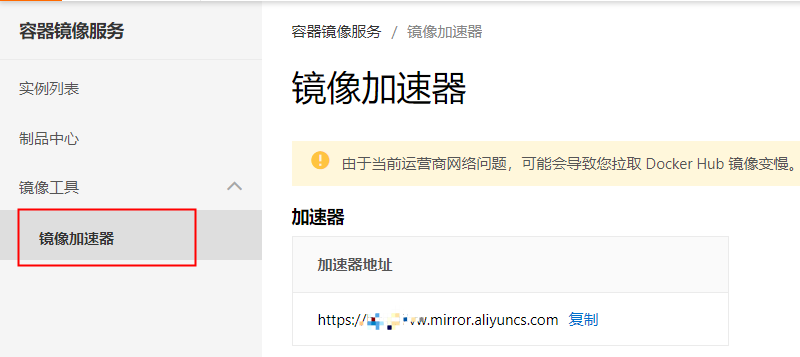
这个阿里云的容器镜像服务之后还会用到,到时候再说
还需要注意一点,本地进行镜像打包需要在docker里开启

才可以进行打包的操作
配置项目中的Maven
Maven中使用docker-maven-plugin插件进行镜像的打包和推送
-
我首先在根目录下的
pom.xml进行了plugins的manage<properties>
<docker.repository.registry>registry.cn-hangzhou.aliyuncs.com</docker.repository.registry>
<docker.repository.namespace>loveliness</docker.repository.namespace>
</properties><build>
<pluginManagement>
<plugins>
<plugin>
<groupId>com.spotify</groupId>
<artifactId>docker-maven-plugin</artifactId>
<version>1.2.0</version>
<!--将插件绑定在某个phase执行-->
<executions>
<execution>
<id>build-image</id>
<!--将插件绑定在package这个phase上。也就是说,用户只需执行mvn package ,就会自动执行mvn docker:build-->
<phase>package</phase>
<goals>
<goal>build</goal>
<goal>push</goal>
</goals>
</execution>
</executions>
<configuration>
<serverId>ali-docker-registry</serverId>
<registryUrl>${docker.repository.registry}</registryUrl>
<!--指定生成的镜像名-->
<imageName>
${docker.repository.registry}/${docker.repository.namespace}/${project.artifactId}:${project.version}
</imageName>
<!-- 指定 Dockerfile 路径 ${project.basedir}:项目根路径下-->
<dockerDirectory>${project.basedir}</dockerDirectory>
<goal>push</goal>
<buildArgs>
<JAR_FILE>${project.build.finalName}.jar</JAR_FILE>
</buildArgs>
<pushImage>true</pushImage>
</configuration>
</plugin>
</plugins>
</pluginManagement>
</build> -
在每个有Main函数的微服务下,Maven里需要配置
<build>
	<plugins>
		<plugin>
			<groupId>org.springframework.boot</groupId>
			<artifactId>spring-boot-maven-plugin</artifactId>
			<executions>
				<execution>
					<goals>
						<!--可以把依赖的包都打包到生成的Jar包中-->
						<goal>repackage</goal>
					</goals>
				</execution>
			</executions>
		</plugin>
		<plugin>
			<groupId>com.spotify</groupId>
			<artifactId>docker-maven-plugin</artifactId>
		</plugin>
	</plugins>
</build>
直接通过父级的maven插件配置,无需对每个都单独进行配置
DockerfIle的编写
刚刚我们对docker-maven-plugin进行了配置,但是没有完全将配置配置全部写在xml里,我们还需要一个Dockerfile对每个微服务的打包程序定义
FROM openjdk:11 # 基于jdk11进行打包 |
因为在xml中定义的是
<!-- 指定 Dockerfile 路径 ${project.basedir}:项目根路径下--> |
所以我们将Dockerfile放到每个微服务与pom.xml同级的目录下
每一个微服务都放入一个这样的Dockerfile,在主目录maven进行package的时候就能做到本地dokcer打包镜像,并且推送到私服
私服的配置
刚刚直接在pom.xml中就将服务器等信息进行配置了,这里细说下
<serverId>ali-docker-registry</serverId> |
serverId需要在个人Maven的settings.xml中进行配置
<servers> |
配置完成之后进行打包操作会发现,插件连不上私服,无法推送镜像
修改~/.docker/config.json
{ |
"credsStore": "desktop"是在登录后生成的,删除后重新登录一下
docker login --username=ali_account@company.com registry.cn-hangzhou.aliyuncs.com |
这个命令主要看你的阿里云配置页
登录成功后就可以看到
{ |
这样再通过插件进行镜像上传就没问题了
docker-compose的编写
虽然已经都打上包了,但是还觉的一个个运行太麻烦了?
docker-compose可以编排微服务镜像的启动顺序
version: "3" |
image是刚刚生成完毕的镜像名
之后的参数也没什么说的了
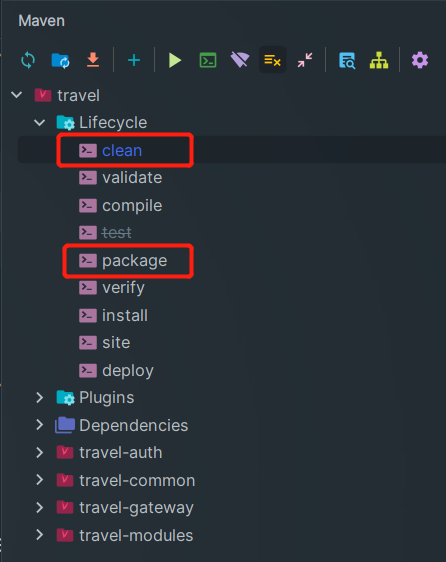
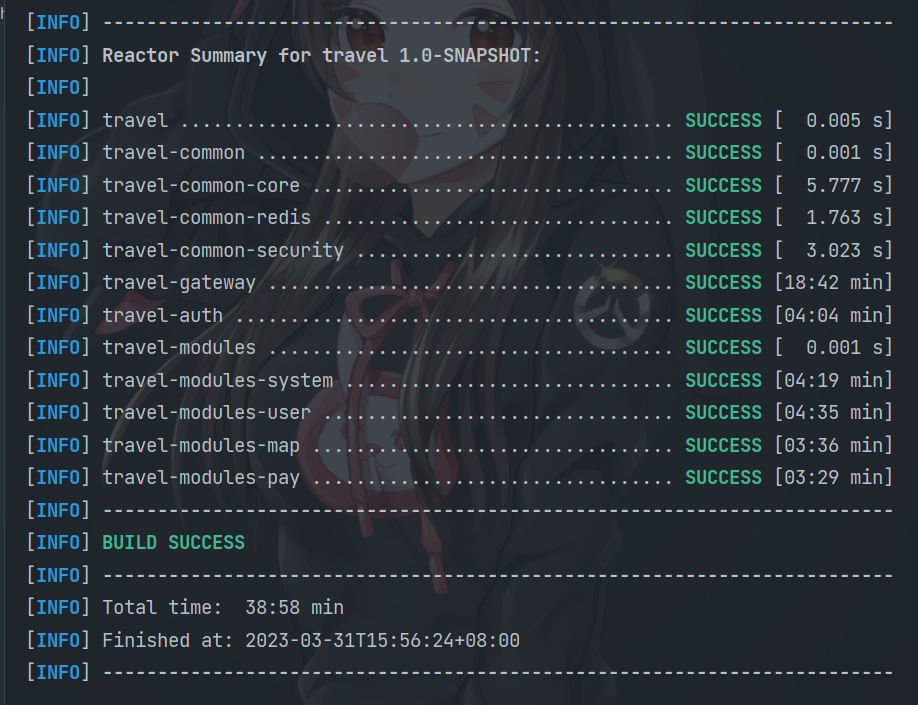
clean后package就可以看到效果了,喝杯咖啡吧(我估计我能喝三杯了)
一共六个微服务,等了有39min,气死了
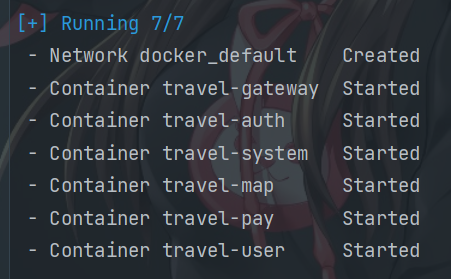
用IDEA直接运行编排文件
在服务器上跑docker的之后再说啦,我的服务器反正跑不起来呜呜呜