WebFlux踩坑实录
WebFlux踩坑实录
从WebMVC升级到WebFlux之后有一些东西都不能按照之前的思维来做
如何从MVC到Flux
去除
<dependency> |
添加
<dependency> |
转到Flux之后你需要知道的事情
-
响应式编程,需要一个订阅,你的流才能流动。
-
Flux响应式编程,可以理解为全走了异步线程池,所以你的代码需要返回一个Mono或者Flux。
-
什么是Mono,什么是Flux。Mono是返回0-1个元素的数据,Flux是会返回0-N个元素的数据。
-
TherdLocal不能使用,需要使用到Context上下文来进行传递参数。
- 可以使用
Mono.deferContextual(ctx -> Mono.just(ctx.get("")));来获取到你存在上下文里面的值 - 可以使用
Mono.just(需要处理的内容).contextWrite(Context.of("key", val))来设置上下文
- 可以使用
-
不存在拦截器,只有过滤器WebFliter
public Mono<Void> filter(ServerWebExchange exchange, WebFilterChain chain)
// ServerWebExchange包含请求和响应
// WebFilterChain是请求链
// 可以使用 exchange.getSession() 来获取session
// 可以使用 chain.filter(exchange) 继续执行 -
全局异常处理器和传统的MVC使用形式相同
-
block是将Mono
变为T的函数,但是在某些线程内不允许我们这样做,这样是阻塞式编程,你可以使用 Mono.fromCallable(() -> 需要阻塞的方法
.contextWrite().block()) // 可选,写入上下文,对应4
.subscribeOn(Schedulers.boundedElastic()).block();对于同步阻塞的调用,如果直接调用会阻塞主线程,而在响应式编程中,主线程数量往往等同于cpu核数,一旦阻塞,就会产生问题导致吞吐量极速下降。
为此,可以只用上面的方法,把一个同步阻塞的代码(比如一次http请求)封装成一个Mono, 并使用subscribeOn方法用Schedulers.boundedElastic()线程池来实现异步效果。
踩坑点
-
拦截器的实现
-
因为2.5,我们知道不存在拦截器,只有过滤器WebFliter,所以登陆鉴权的功能实现需要在这里进行
-
实例代码
-
import com.baiwang.moirai.utils.ValidatorUtil;
import org.apache.commons.logging.Log;
import org.apache.commons.logging.LogFactory;
import org.springframework.context.annotation.Configuration;
import org.springframework.http.HttpCookie;
import org.springframework.http.server.reactive.ServerHttpRequest;
import org.springframework.util.MultiValueMap;
import org.springframework.web.server.ServerWebExchange;
import org.springframework.web.server.WebFilter;
import org.springframework.web.server.WebFilterChain;
import reactor.core.publisher.Mono;
import reactor.util.context.Context;

@Configuration
public class LoginFilter implements WebFilter {
	private final Log logger = LogFactory.getLog(this.getClass());

	@Override
	public Mono<Void> filter(ServerWebExchange exchange, WebFilterChain chain) {
		return exchange.getSession().flatMap(webSession -> {
			ServerHttpRequest request = exchange.getRequest();
			String authToken = null;

			MultiValueMap<String, HttpCookie> cookies = request.getCookies();
			authToken = String.valueOf(cookies.get("TOKEN"));

			String token_session = (String) webSession.getAttribute("TOKEN");

			// 测试免登陆
			if ("TOKEN".equals(authToken)) {
				return chain.filter(exchange);
			}

			if (ValidatorUtil.isNull(authToken)) {
				return Mono.error(new Exception("TOKEN为空,请重新登陆!"));
			} else {
				webSession.getAttributes().put("userInfo", userInfo);
				webSession.getAttributes().put("TOKEN", authToken);
				return chain.filter(exchange)
						.contextWrite(Context.of("userInfo", userInfo));
			}
		});
	}
}
<!--code4-->
-
-
链路追踪(仅仅是Traceid的实现)
-
由于响应式编程的影响ThredLocal不能使用MDC也没有办法正常使用,Spring Sleuth也不再继续维护,所以我们需要换到micrometer
-
pom中添加依赖
<dependency>
    <groupId>io.micrometer</groupId>
    <artifactId>micrometer-tracing</artifactId>
</dependency>
<dependency>
    <groupId>io.micrometer</groupId>
    <artifactId>micrometer-observation</artifactId>
</dependency>
<dependency>
    <groupId>io.micrometer</groupId>
    <artifactId>micrometer-registry-prometheus</artifactId>
</dependency>
<dependency>
    <groupId>io.micrometer</groupId>
    <artifactId>micrometer-tracing-bridge-otel</artifactId>
</dependency>
<dependency>
    <groupId>io.micrometer</groupId>
    <artifactId>context-propagation</artifactId>
</dependency>
<dependency>
    <groupId>org.springframework.boot</groupId>
    <artifactId>spring-boot-starter-aop</artifactId>
</dependency> -
在Application启动类内添加
public class OutputAiApplication {
public static void main(String[] args) {
Hooks.enableAutomaticContextPropagation(); // 这段
SpringApplication.run(OutputAiApplication.class, args);
}
} -
配置文件中
management:
  endpoint:
    gateway:
      enabled: true
  endpoints:
    web:
      exposure:
        include: health,gateway,prometheus
  tracing:
    enabled: true
-
-
OpenFeign的阻塞
当使用OpenFeign作为Grpc调用工具时,响应式编程可能会不允许你使用block方法,这是OpenFeign没有对响应式编程做兼容导致的,我们需要
public class BlockingLoadBalancerClientConfig {
LoadBalancerClientFactory loadBalancerClientFactory;
LoadBalancerProperties properties;
public LoadBalancerClient BlockingLoadBalancerClient() {
return new CustomBlockingLoadBalancerClient(loadBalancerClientFactory, properties);
}
}public class CustomBlockingLoadBalancerClient extends BlockingLoadBalancerClient {
private final ReactiveLoadBalancer.Factory<ServiceInstance> loadBalancerClientFactory;
public CustomBlockingLoadBalancerClient(LoadBalancerClientFactory loadBalancerClientFactory, LoadBalancerProperties properties) {
super(loadBalancerClientFactory);
this.loadBalancerClientFactory = loadBalancerClientFactory;
}
public <T> ServiceInstance choose(String serviceId, Request<T> request) {
ReactiveLoadBalancer<ServiceInstance> loadBalancer = loadBalancerClientFactory.getInstance(serviceId);
if (loadBalancer == null) {
return null;
}
CompletableFuture<Response<ServiceInstance>> f = CompletableFuture.supplyAsync(() -> {
Response<ServiceInstance> loadBalancerResponse = Mono.from(loadBalancer.choose(request)).block();
return loadBalancerResponse;
});
Response<ServiceInstance> loadBalancerResponse = null;
try {
loadBalancerResponse = f.get();
} catch (InterruptedException e) {
e.printStackTrace();
} catch (Exception e) {
e.printStackTrace();
}
if (loadBalancerResponse == null) {
return null;
}
return loadBalancerResponse.getServer();
}
}添加这两个配置就好
延展阅读
本博客所有文章除特别声明外,均采用 CC BY-NC-SA 4.0 许可协议。转载请注明来源 喵喵博客!
相关推荐
2025-09-17
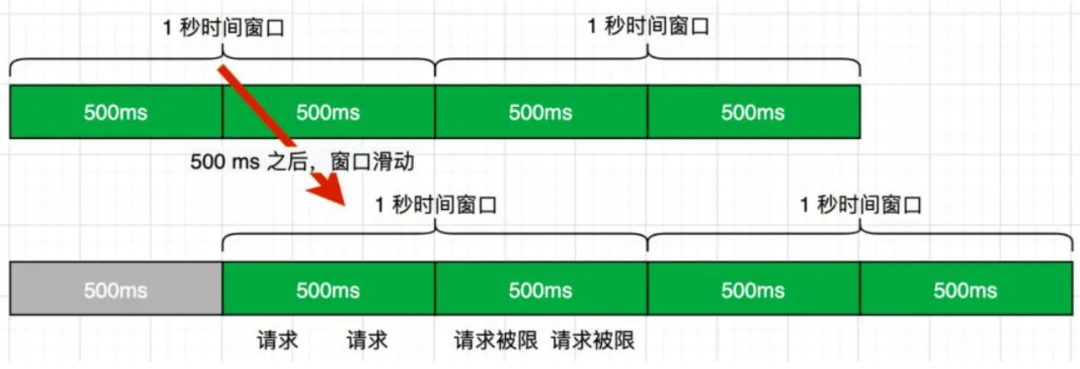
基于Redis滑动窗口实现的限流
Redis可以实现多种多样的限流,基于滑动窗口是比较简单的一种实现方式 使用Zset的数据结构,为有序数组,我们可以根据时间窗口来删除数据,这样就记录了在一个时间窗口内存在多少请求,以此为依据来进行限流 实现 在Pom中引入Redis的依赖(标准项目应该都会有) 创建一个注解来标记 /** * 自定义限流注解 * 用于基于Redis实现的分布式限流 */@Target({ElementType.METHOD})@Retention(RetentionPolicy.RUNTIME)@Documentedpublic @interface RateLimit { String TENANT = "tenant"; String ORG = "org"; String USER = "user"; /** * 限流key前缀 */ String keyPrefix() default ""; /** * 限流时间窗口(秒) */ int period() d...

2025-03-12
SpringAI 从0.5到1
SpringAI 从0.5到1 为什么是从0.5到1呢,因为Ollama的过程我就不再赘述,网上的教程也很多,本篇将使用Ollama+SpringAI进行叙述。 开始 创建一个SpringAI项目 你可以使用SpringIO的QuickStart,我这里贴出我的Pom(主要的一些东西) <dependency> <groupId>org.springframework.boot</groupId> <artifactId>spring-boot-starter-webflux</artifactId></dependency><dependency> <groupId>org.springframework.ai</groupId> <artifactId>spring-ai-ollama-spring-boot-starter</artifactId></dependency><dependency&...
2025-04-10
SpringAI + RagFlow的火花
SpringAI + RagFlow的火花 嗨嗨嗨,时隔多日,喵喵又来更新了,为什么过了这么久才来补上SpringAI的Rag捏,因为项目更改方向了,用DIFY来构建智能体,操作确实简单,但是拓展上还是有一些局限的,所以到现在才来更新,这次更新直接上硬核的,两个不同的框架如何兼容 首先,RagFlow是什么,RAGFlow 是一款基于深度文档理解构建的开源 RAG(Retrieval-Augmented Generation)引擎。RAGFlow 可以为各种规模的企业及个人提供一套精简的 RAG 工作流程,结合大语言模型(LLM)针对用户各类不同的复杂格式数据提供可靠的问 答以及有理有据的引用。 本文用到的仅限于使用其中的知识库功能 开始 SpringAI添加Rag功能 根据SpringAI的官方文档,我是用ES作为Rag驱动的向量数据库 添加依赖 <dependency> <groupId>org.springframework.ai</groupId> <artifactId>spring-ai-elasti...

2023-03-31
Docker打包SpringCloud应用镜像
Docker与SpringCloud微服务打包,并使用阿里云私服进行镜像托管 前言 之前就像把自己的毕业设计放到服务器上跑了,但是受限于多个微服务,服务器性能不够的因素,还是一直没有实现. 看到了关于SpringNative的介绍公众号,这玩意确实牛逼,但是使用的限制比较大,以后有时间的话可能会弄一下. 在网络上想要把Spring服务打到Docker镜像里搜到的教程都是Boot的,但是仔细一想,Cloud也只是基于Boot的,不过相互可以进行通信 准备工作 要部署的项目 首先准备的就是一个想要部署的多个微服务,因为之前开发的毕设都在一起,就直接拿这个当作例子了 Docker 之后是Docker的安装,因为在win上,直接安装了Docker Desktop 安装完成之后配置阿里云的镜像加速源 "registry-mirrors": [ "https://******.mirror.aliyuncs.com" ] 个人的加速源可以在这里查看 这个阿里云的容器镜像服务之后还会用到,到时候再说 还需要注意一点,本地进行镜像打...